Making your own Resource Pack: Changing Items, Blocks, & Text (1.19)
- Professional Loser

- Jan 23, 2023
- 7 min read
Updated: Jan 23, 2023
In this tutorial, you'll learn how to change items, blocks, and text in your own Resource Pack.
The steps are centered around a Windows Computer, so if you're doing this on mac, you may have difficulties!
You'll learn how to change a Diamond Sword into a "Lightsaber", a Redstone Lamp into an "LED Block", and how to change the text of both.
These packs are very simple to create, as long as you follow the same steps.
Oh, and make sure to type anything in "quotations" exactly as they're written.
Don't know how to edit data files? See: How to edit Data files for Minecraft
Starting From Scratch
The first step is to create a new folder. The name of this folder is the name of your Resource Pack, so let's call it... "Test Pack". Don't worry, you can always change the name later.
Press right-click, then go to "new". Click "Folder".
Alternatively, use Ctrl+Shift+N to make a new folder quickly.
(I'll be including photos of each step, so you can follow along!)

For now, it doesn't matter where you put the folder, so put it on your Desktop or anywhere else you can easily find it later.

Next, open up the folder. We'll make a new text file, and then another new folder. Name the new folder "assets" (remember, you can use Ctrl+Shift+N).
To make the text file, right-click, go to "New", then select "Text Document". Do this inside the "Test Pack" folder, but NOT the "assets" folder.

Name the file "pack" and change the extension of it (the .txt part) to ".mcmeta".
The reason for us doing this is because Minecraft reads Resource Packs in a specific way.
When loading a pack, it first looks for the root folder (our "Test Pack" folder), and then looks for "pack.mcmeta". That file tells Minecraft that the folder is a Resource Pack.
All the steps we're taking are specific because Minecraft reads them like that-- you'll understand it as we go along.
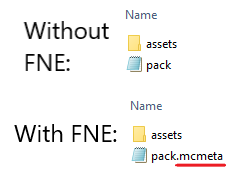
The folder should look like this when you're done:

By the way, here's a tip that will save you time:
Go up to "view", click it, and enable "File Name Extensions". That will allow you to edit the file extensions easily.

Next, copy and paste this code into it (or, if you know how to write JSON, you can do this part manually!):
{
	"pack": {
	 "pack_format": 9,
	 "description": "mmm yummy flavor text"
	}
}
The "pack_format" area changes depending on the version you're using. For 1.19, use pack format 9. For 1.18, use 8, and so on.
Minecraft will tell you that the pack is "out of date" if the pack format doesn't match the version.
This doesn't mean the pack won't work, but some things in it might not. Obviously, running a pack meant for 1.19 in 1.8 probably won't work the way you'd want.
The description can be anything you want, that's just what will show up when we look for the pack later. You can leave it empty if you like.
Next, open the "assets" folder and create another folder, named "minecraft".
The "minecraft" folder is what houses all the different things that you can change with a Resource Pack. As you can imagine, there's a lot of subfolders than can be inside. For this tutorial though, we only need to make 2 subfolders.
Create 2 new folders inside the "minecraft" folder. One named "textures", and the other named "lang".

The "lang" folder contains and controls all the language files for Minecraft. Obtaining the default language files is a bit of a hassle, so I went ahead and got the text of the "US" English version for you.
It's been edited to only include what we're changing today.
Open the "lang" folder and create another text document, then name it "en_us.json". That will make it a .JSON file, which is what Minecraft reads.
Copy and paste this into the file. Don't forget to save!
{
  "language.name": "English",
  "language.region": "United States",
  "language.code": "en_us",
  "block.minecraft.redstone_lamp": "Redstone Lamp",
  "item.minecraft.diamond_sword": "Diamond Sword"
}
Normally, there's a LOT more in this file. If you want the full version, I have a download of it here. You don't need it for this tutorial, so just keep reading.
Editing The "Lang"
Alright, so these are all the lines of code we'll need to edit to get this to work. Anything we don't write in this file is replaced with the default text for those items, which is fine because we aren't editing anything else.
Now, you may be able to tell how this file works. The all lowercase text on the left of the file (the text seperated by periods) is the file path. Minecraft reads it as "(type of path).minecraft.(name of item)". In our case, we're changing the "block" path, under minecraft, under "redstone_lamp".
Minecraft really doesn't like spaces or special characters in the file path, so only use underscores, undercase, and periods.
The text on the right is the name of the item in-game. This text we can edit how we want.
Just keep the edits inside the quotations.
Change "Block of Redstone" to "LED Block" and change "Diamond Sword" to "Lightsaber".
DON'T touch the file path text-- again, that's the "item.minecraft.diamond_sword" stuff.
Minecraft needs to read that to tell what we're changing.
Got all that?
I know, it's a lot. But you're doing great so far!
Alright, we're all done with the names.
But, wait! We changed the names of Diamond Swords and Redstone Lamps, but they still look like they haven't changed. Time for the fun part!
The Fun Part (Making Your Textures)
Remember that other folder we made, called "textures"? Let's open that one up.
In it, make 2 more folders. Call them "item" and "block".
We'll start with the "item" folder.
The Item folder handles the texture for every single item in the game. An "Item" is simply anything you can't place in the world, like Sticks or Saddles.
Don't be confused though-- just because you can't place it doesn't mean you can't use it, like how a Water Bucket is used but an Oak Log is placed.
Here's another zip file. It has the files we'll be editing, so go ahead and unzip it.
The Redstone Lamp file actually consists of 2 images: the "on" and "off" textures, which is why there's 3 files in that zip.
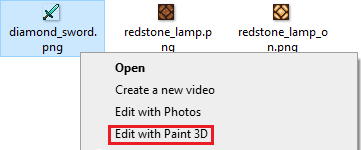
You should have an image editor of some kind on your computer. If you don't, go online and look up a browser image editor. For this tutorial, we'll use Paint 3D.
Right-Click the "diamond_sword.png" file, and click "Edit with Paint 3D".
Ok, this next part is really up to you.
Since we're just changing the texture to a "Lightsaber", you can change it to whatever YOU think a lightsaber should look like.
Whether that means having a darker-colored handle, or changing the color of the sword, you do you!
We're going to use the Pixel Pen with a thickness of "1", which just lets you color individual pixels. Makes your life easy.
Just keep 1 thing in mind, though. Make SURE your textures are 16x16 pixels, which you can check by looking at the size of the canvas.

8x8 is the minimum size for your textures, although you CAN go above this to 32x32, 64x64, or even 512x512.
Obviously, the higher you go, the more detailed your texture will look (and the more hardware you'll need to run it, for anything above 200 pixels), because you'll have a lot more pixels to edit and work with.
Also, check and make sure your image is transparent.
If it isn't, it will NOT look good in-game, trust me.
Here's the texture I made. You can feel free to copy how it looks--but you can't download it!
I'm making you do this part on your own. Get creative!

For the Redstone Lamp, follow the same process. Doesn't have to be complicated.
Here's mine:


All finished? Great!
Now, we'll put them in the game.
Save all images as a png. It has to be a .png because we need to set it as a transparent background.
Again, it will NOT look good if the background isn't transparent. It'll set the whole thing as a big square.
Also, make sure the file names are the same as when you downloaded them.
The lightsaber should be named "diamond_sword.png", the "off" version of the lamp should be named "redstone_lamp.png", and the "on" version should be named "redstone_lamp_on.png".
Back To The Pack
Go back to the "item" folder. In case you forgot, it's the folder inside the "textures" folder.
Put the lightsaber you made ("diamond_sword.png") in it.
Now go to the "block" folder and put the 2 redstone lamp files in there.
Minecraft is going to read these folders every time it starts up the Resource Pack, and the way it does this is by looking at the file names.
If you renamed the lightsaber texture to "stick.png", Minecraft would look at the file, see it's called "stick", and change the texture of the Stick in the game to your lightsaber texture.
Minecraft will also not like it if you put a file in the wrong place.
You can't change the Redstone Lamp texture if it's in the "item" folder, because it isn't an item.
Each item and block in Minecraft has a specific In-Game name and a File name. They aren't always the same!
Thankfully, pressing F3+H in game will allow you to see both the In-Game and File names of any item or block. Very helpful!
Last Stretch
Phew, ok! We're nearly done now!
The last thing we gotta do is put all of this in the game! If you've gotten to this point, you've done great!
This next step is only really necessary if you plan on sharing this pack with a friend or something. Otherwise, ignore this part.
Go back to your "Test Pack" folder. Select everything in it with Ctrl+A.

Then, go to "new" and send it to a new Compressed Zip File. Name the zip file to "Test Pack", since that's the name of your pack.

Both zipped and unzipped folders can be read and used by Minecraft, but you can't share unzipped folders online.
Here's the basic structure of your pack at this point:
[Test Pack] --> [assets], "pack.mcmeta" --> [minecraft], [lang], [textures]
[lang] --> "en_us.json"
[textures] --> [block], [item]
[block] --> "redstone_lamp.png", "redstone_lamp_on.png"
[item] --> "diamond_sword.png"
Got all that? It's written a bit weirdly, but it makes sense if you've been following along.
So, how's it look?
Now we find out how it looks in-game!
When you open Minecraft, go to the "Resource Pack" screen (accessible in the main menu and by hitting escape in-game) and click "Open Pack Folder".
Navigate to where you stored the "Test Pack" folder. Again, zip files and regular folders can both be read.
Once you find your folder, select it. It should appear in that list of Resource Packs now!
Move your pack over to the right "selected" area, and make sure it's ABOVE the default Resource Pack.
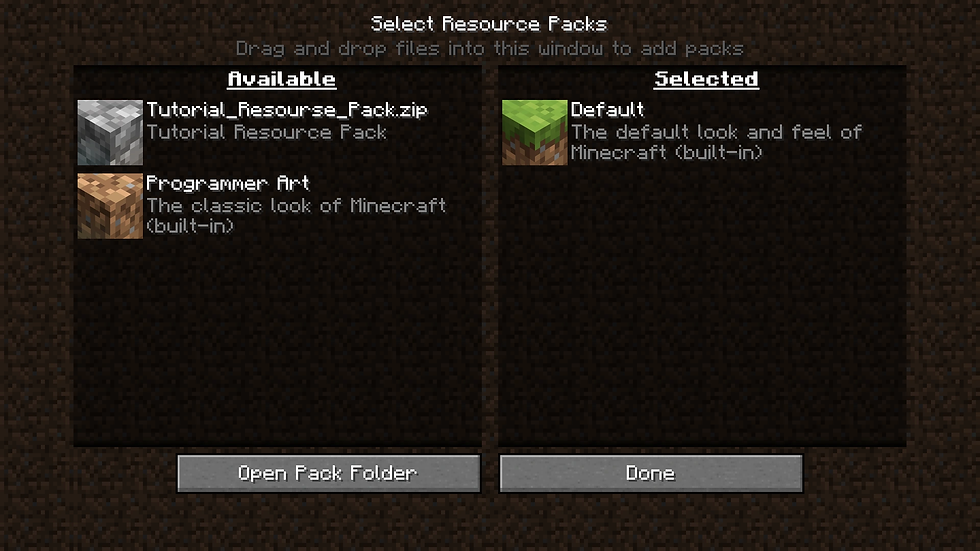
Minecraft reads and applies packs based on where you layer them in this screen.
Whichever pack is at the bottom is read and applied first, and then the one above it, and so on.
So, if you put the default Pack above your custom one, Minecraft would read and apply all the changes you made, and then ignore them because the default Pack overwrites your changes anyway.
Alright. Let's get into a world and see how this looks!

Ooh, that looks pretty good! Well done if your game looks like this, it means your pack is working!
Remember that you can do this with any item or block in the game!
You can have Iron Swords be Baseball Bats, a pair of Shears being Scissors, a Bow being a Gun, a Block of Gold being purple... anything!
Oh, and one last thing before we wrap up-- you can animate your textures. This means a bucket of lava changing to water, or a Netherite Axe that looks like a moving chainsaw.
But I'll make a tutorial on that later. :>
Thanks for reading! Get creative!


Comments